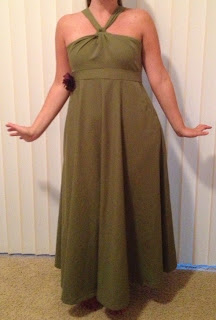
The cool thing about this dress, besides the slash pockets, is that in the front it appears to be a halter but the straps go straight down through loops, then tie in the middle of your back. This feature not only makes the dress perma-adjustable, it also is much more comfortable than a true halter neck in my opinion.
There were a few firsts for me in making this dress, which is to be expected since I'm still brand spanking new at sewing anyway. First it had many more pieces than I'd worked with before. It also had interfacing. Pockets. A waistband. Luckily Tasia at Sewaholic had already done a sew-along for the Lonsdale dress. All I had to do was follow the steps. Between the awesome pattern instructions and the sew-along, I have to say this dress came out pretty freaking spectacular. I even conquered understitching! I just needed it to be explained in a way that made sense to me. There are a lot of little features in this dress that I'm particularly proud of, and when I finished the dress I was pretty freaking happy.
- The bodice is self lined, and the lining is understitched. As I already said, I finally was able to understand understitching and the finished product is nothing short of exceptional. I heart understitching.
- The waistband also has it's own back side, which is slip stitched into place covering the seam between the front waistband and the skirt. Unfortunately I didn't take a picture of it, but the inside of the dress looks pretty freaking nice.
- Stay tape is magical. Tasia used stay tape in her tutorial so I used it too, and it really is wonderful. I think I'll use stay tape in some other things going forward.
- Hand-picked zipper. The dress has a 16" zipper and I installed it by hand-picking it. Seriously, I'm not sure why I should ever need to install a zipper with topstitching. Hand-picking is awesome, and a beautiful hand made feature. I used Tasia's tutorial here.
- Blind hem. I meant to hand sew the hem, but I ran out of time. I still wanted her to have a beautiful dress so I pulled out my sewing machine's manual and figured out how to use my blind stitch feature. I'm in love with it. Seriously, this is genius and it looked pretty awesome.
The bride looked beautiful in her finished dress. I used a lovely moss green linen blend which was supersoft and matched her eye color perfectly. We added a little fabric flower on the side for fun.
I shortened the bodice more than I've seen anyone else across the interwebs shorten it. This was my friend's smallest point. That's the beauty of sewing though, it's totally customized to your body. None of this trying to fit your body into clothes. Now the clothes are made to fit YOU! It's awesome.
Overall, I'm pretty proud and ecstatic with how the dress turned out. It fits her beautifully, looks beautiful on her, and is a high quality made dress. That ****I**** made. There you have it. The joy of sewing.


No comments:
Post a Comment
I would love to know your thoughts! Leave a comment here.