UFO, Finished Projects, Future Projects, and Excessive Thoughts

Monday, December 30, 2013

I got bored with my purse.  I was getting so frustrated trying to sew the damn straps that I just gave up.  I did sew one strap on, as well as snap a needle.  Here is a picture of the almost finished product:


It came out satisfactory.  My mother in law actually gave me a book on bag making for Christmas, so I'm looking forward to picking up new ideas and info from it.

Moving right along, just because I finally have an official UFO (unfinished object) doesn't mean I haven't been sewing and planning future projects.  I try not to plan too far ahead or buy the fabric before I have an intended purpose for it.  Otherwise I'll just go crazy with all the stuff I want to do but can't do.  So I try to take it one project at a time.

First up, I made a Lady Skater dress.  It's imperfect, but it's stupid comfortable and I love the fabric.  I got this charcoal rayon blend jersey from Joanns.
My apologies for the dirty mirror.  I really should clean it someday.  Or upgrade to taking real pictures.
This was my first adventure sewing with knits.  Well, besides Hub's Renaissance Festival costume which was whipped up with minimal thought put into it.  (I meant to link to a post on this, but apparently I never blogged about it.  It just consisted of a modified long sleeve t-shirt and modified pj pants.)  Honestly, I don't know why people are so afraid of sewing with knits on a regular sewing machine.  With the right tools it was easy as (frozen) pie, and the end result is about a million times more comfortable than a woven.  The Lady Skater pattern also came with insanely excellent instructions and lots of resources for info sewing with knits.  I'll very likely make another one and work out the kinks.

I also made a Christmas skirt inspired by Lauren's Tree Skirt Skirt.
I was trying to draft a circle skirt, but they're a total mathy PITA, so I used the circle skirt pattern pieces from a dress I've made previously and modified the waist to sit lower on the hips.  I cut a long rectangle for the waistband, inserted a pocket in the side seam, and hand picked the zipper on the opposite seam.  I also made a new black petticoat to go with it.  I could have made it fluffier but I was short on time (nothing like last minute projects!) and, well, petticoats are a huge headache to make.
This is what happens when someone tells me to dress festive - I go all out!  I literally picked out the loudest, most colorful holiday fabric from Joanns and went crazy.  You can't tell, but the skirt is also covered in silver glitter.  Bam.  My side seams are perfect and my hand picked zipper is gorgeous.  Unfortunately the skirt ended up several inches too big so I had to pin the sides to make it wearable.  I say unfortunately because the waistband is adorbs and it's a shame no one got to see it.  (These pictures were taken after a full day of sitting at work, hence the wrinkles.)  Oh well.  I made the skirt knowing I would only get to wear it a couple times so I didn't bother taking it in.

Next I have two patterns I plan on working on.  I'm not sure which one I'll do first, probably the dress.

I bought this royal purple jersey for the dress...
and this Paris Green tonal stripe jersey for the top, both from Girl Charlee, which is now my favorite online source of jersey fabric.  Everything is like $6/yard, which is perfectly in my price range!
I tried to keep in mind my personal style and what colors and prints really appeal to me for every day wear.  I know sometimes this is an issue with sewing because we get so excited over pretty prints and colors when really they aren't things we would reach for on a daily basis.  I know these jewel tones and a subtle stripe will fit right into my wardrobe.

The dress I first saw on another blogger's page and decided it was for me! 
It's basically like a Lady Skater with a cowl neck.  I might even use the Lady Skater skirt pieces, because they are just so swingy and fun.  Oddly enough I can't find this dress on the interwebs, only the blog I found it on and one other.  So that will be great fodder for my blog!  I will make sure to tag it up the wazoo for other people to find.

Next up is Cake Patterns RiFF Cabarita top.
This is a nice basic t-shirt with a little visual interest in the collar and back v.  It's really made to highlight stripes, but I would like to make it in a solid too just to have another basic top to wear around.  I plan on making the sleeves elbow length for a little extra warmth.

I might have mentioned before that I was planning on making a pattern off a dress I already own, which I did, but I haven't made progress on the dress except to buy lining fabric.  I plan on making a muslin out of my lining fabric to make sure the dress will fit properly, but it isn't really a priority since it's been so cold.  Wearing a short sleeve dress isn't very appealing right now.  More dresses out of a nice weight jersey sound much warmer, so that's what I've been looking at!

So, there is a lengthy update on what I'm up to and what I've been doing.  What kind of clothes do you like to make in the winter?

Haunted Mansion Purse: Fabric and Purse Guts

Tuesday, December 10, 2013

Now that I have a pattern, I laid out all my purse goodies in preparation for purse making.
To add fanciness, I'm installing purse feet.  A good purse should always have some feet.  I'm also using magnetic snaps to close the outer pocket and the purse itself, as well as metal rings for the straps.
Now, I've never made a real purse before so I did some research on what goes into a purse.  There are so many choices for interfacing and of course, many opinions on what should be used.  Luckily this purse is just for me so I have freedom for trial and error.

I chose to go with Thermolam and some fusible fleece.  Thermolam, I thought, is supposed to be stiffer than fusible fleece so I planned to interface my exterior with Thermolam and my interior with fusible fleece.  However, even though I bought 1 yard of each, the fusible fleece was much more narrow than the Thermolam.  I ended up interfacing my interior and exterior opposite how I planned, but I think it's going to work anyway.  The fusible fleece I bought actually seems stiffer than the Thermolam though there is not that much difference.  I also read that Thermolam is less likely to crinkle when fused.  I know there are people out there who could read this post and tell me that I'm totally wrong, but like I said, I'm ok with trial and error here.  Wish me luck!

Haunted Mansion Purse: Drafting a Pattern

Tuesday, December 3, 2013

Once I had my own little line drawing of my purse design, I needed to figure out how to translate that into a pattern.  I took my trusty ruler and figured out what dimensions I wanted my purse and all it's features.  I dissected the drawing and drew out examples of all the pieces I needed.  From there it was just a matter of measuring and drawing it out on Swedish Tracing Paper, adding seam allowance, and cutting it all out.

Don't forget to label each pattern piece and write how many pieces need to be cut, just like a normal pattern.
Next up, cutting the fabric!

Dooney & Burke Haunted Mansion Inspired Purse

Tuesday, November 26, 2013

It has been suggested to me that I make purses.  I've already made two little bags for the Renaissance Festival, why not keep at it?

So I did some googling research on it and drew up a design for a super cute purse for myself.  It was going to be grey corduroy and totally adorable.  I was looking at fabric to line it with when I had a sudden inspiration to imitate a purse that I.Am.In.Love. with.

The Dooney & Burke Haunted Mansion purse.


Now, I've never been one for labels.  Especially ridiculously priced purses.  #sorrynotsorry.  Then came this one.  So dark.  So beautiful.  So unique.  I need it.  I need it despite the $330 price tag and likelihood of it always being sold out.

I started to draw up a design I knew I could make.  I googled how to do a few special things to up the oomph factor.  I had decided on a black on black damask print fabric for the interior of my grey corduroy purse when I realized it actually would be perfect for my own version of the Haunted Mansion purse.
Yep.  That will do.  I picked a bright red broadcloth for the interior, and black sateen for the straps. (Leather straps are like, $20 for a set.)  The next step is to turn my drawing into pattern pieces on swedish tracing paper, then it's off to assembly!  SOEXCITED.

The Great Cape Adventure: Finished Product

Thursday, November 21, 2013

The moment you've all been waiting for ..... the finished cape!

I had Hubs take some pictures of me with his fancy camera.  So warm and cozy!

It was a beautiful day too, probably one of the last lovely days of Fall this year.


The last couple of pictures are to show how the arm hole and interior pocket are one in the same.  It's pretty hard to visualize this with just the pattern description!  The coat is very warm and cozy, and I've received several compliments on it!  I just love how unique it is.  Maybe next year I will muster up the courage to make something like this:
Hello, Adorable!!!  Can I do this?  HELLS YEAH I CAN DO IT!  Okay, ready to see some new stuff??  On to the next project!

The Great Cape Adventure: Drafting A Lining

Tuesday, October 29, 2013

I went into The Great Cape Adventure knowing I wanted to line it for extra warmth.  What I didn't expect was the desire for it to look so pretty from the inside too.  And let me tell you, boy, does it look pretty.

When I don't know how to do something I generally do a combination of winging it and seeing if people smarter than me have put instructions on the interwebs for me to follow.  Most of the time this combination works out pretty well.

My pattern didn't come with instructions for a lining, so I sort of followed the tutorial written by Tasia on Tilly and the Buttons.  Since my pattern doesn't have sleeves, and mine does have a collar, I modified the instructions to fit my needs.  Sewing is all about bending the rules, right?

I traced my original pattern pieces onto Swedish Tracing Paper and used Tasia's instructions to draft the lining pieces.
I know.  This picture sucks.
The original pattern pieces are in blue, and where I made modifications to where I actually needed to cut are in pink.  I also made sure to transfer over other markings, like the circles for the pockets because I wouldn't want to cover up the pockets I worked so hard on!

The pockets were also a difference from Tasia's tutorial because I needed to use the same seams due to those pesky pockets.  So my lining had four pieces instead of her two.

I cut out my new pattern pieces, labeled them accordingly, and sewed up my lining.  For the hand/pocket holes, I cut into the fabric at the holes and did a turn and stitch approach to create the space and take care of the raw edge.  Also, since my jacket already has a pleat, I added an extra inch to Tasia's recommended 1" to make sure I have plenty of wingspan for hugs.

Once I had all my lining pieces attached at the proverbial hip, I lined up the collar and the top of my lining right sides together.  Oh wait!  This is where I added my hanging chain.  Tasia had used a tutorial that she linked to quite a while ago, but when I went to the link the blog was gone.  So, I winged it.

I picked up some grosgrain ribbon and a bracelet/necklace making kit.  I used two jump rings and a length of the bracelet, cut two pieces of ribbon about 2" long, folded them in half (for extra strength) and pinned them in place.  While sewing the lining in place, I made sure to go over the ribbon ends lots of times to make sure they don't pull out. 

Since my cape is kind of an awkward shape all around, the lining that attaches to the collar was the only part I could sew by machine.  I went down each side and methodically hand stitched the lining the the facings.  I slip stitched the pocket opening to the pocket holes and welt flaps.  Finally, I folded the bottom edge under and slip stitched to the seam line.  I did this to create vertical ease in the lining.  If you look at the inside of a lined jacket, you will see that the lining either has a fold at the bottom, or the lining hangs free and is tacked in at a couple select spots, like the seams. 

ITZSOPREEEETTYYYYOMG
And then .... drum roll please .... A FINISHED CAPE!!!!!!  Photos to come.

The Great Cape Adventure: An Almost Finished Cape

Tuesday, October 22, 2013

I've spent a large chunk of time avoiding chores sewing this lovely cape, and it's almost done!  Soon I'll be able to prance about in it while feeling snuggly warm.

I finished matching up all the pieces together.  This wasn't a particularly easy task.  My hang up was matching the sides together and eventually I gave up and hoped for the best.  I lined up the front and front side pieces, then the back and back side pieces.  When I put them all together they magically lined up on the sides too!  I guess I'm a pretty awesome plaid matcher.

My next step was putting in the facings, but I knew I wanted to try my hand at bound buttonholes so I needed to do that first.  I used Julia Bobbin's tutorial (she.is.awesome.) which was the most comprehensible bound buttonhole tutorial I've seen.  Seriously, why is everyone else making it so complicated??  Julia even included how to make facings with little matching windows for the buttonholes.  I did one practice buttonhole and it turned out pretty awesome.  So I made four more on my actual fabric.  Omg scary.  Cutting into my beautiful precious fabric!  What if I screwed up!  What if they are ugly!  Well, whatever.  Buttonholes are usually covered by buttons anyway.  But!  They turned out beautiful.  Now I'm looking at off the rack coats judging their quality on whether they have bound buttonholes or not.  (My gorgeous wool coat from Gap does.  Their current selection does not.)
I sewed on my collar and, of course, buttons, and TADAAAAAA!  My cape is ALMOST complete.  I just need to hem it and add the fleece backed satin lining, which is my own addition to the pattern.  I'm also going to add a hanging chain because if I'm going to be awesome then I need to go all the way awesome.

I am pretty sure the plaid isn't really crooked in the back.  Just call me Quasimodo.  Okay don't, because that would make me sad.  I also thought our living room was actually bright at the time I asked Hubs to take these pictures.  A fool I am!

***Bonus pug picture!***  Because she is just so cute.
My little snoring sewing friend.

The Great Cape Adventure: Stitch, Rip, Stitch.

Tuesday, October 15, 2013

I had my first epic sewing fail on The Great Cape Adventure.  I was following my directions swimmingly, quite proud of my little pocket entry edging, had beautifully slip stitched the inside piece of my pocket bag to the pocket hole, basted it to my cape, then perfectly top stitched the pocket bag in place.  I basted my welt flap in place, sewed my front and side pieces together.... and bam!  Something felt wrong.  I went to work the next day googled on my own time pictures of welt pockets and other finished capes.  I learned my welt pockets are special and the general rules do not apply to my cape.  I studied pictures.  Then it dawned on me.

I put the pockets on the wrong piece.
Well.  Crap.  The pockets are to be attached to the front pieces, and I attached them to the side pieces.  I made my perfect pocket openings and cut into my beautiful fabric on the wrong side.  Now it makes sense that when I sewed the front and back pieces together with my welt flap in place, the hole and pocket didn't really flow.

Ahhhhhh.

Well, that's okay.  It had to come sometime.  So, I spent the next evening carefully ripping out my perfect stitches.  Since I had already cut into my fabric to make my pocket opening on the wrong side, I needed to improvise in order to fix it.  Luckily this turned out easier and lovelier than I could have hoped.  Maybe even better than the original instructions!
I sewed the welt flap under the original pocket opening that I had made.  I correctly installed the pocket bags on the front pieces.  Sewed together the front to the side front, and TADA!  Now the welt flap lies perfectly over the pocket hole, while also allowing one's arm out from the cape.  That might not make sense, let me explain.  The arm hole and pocket hole are one in the same.  But the pocket hole gets covered by the welt flap where the arm comes out.  Follow?  Okay.
So.  Lesson learned.  Don't watch Breaking Bad while trying to read weird pattern instructions.  You'll likely become BFF's with your seam ripper if you do.

The Great Cape Adventure: Plaid Matching & Interlining

Tuesday, October 8, 2013

Continuing on The Great Cape Adventure, I needed to figure out how to match plaid.  I bought extra fabric with this in mind.  It really kind of sucked seeing how much fabric is wasted because of the matching!  I need to get myself a plastic bin for all my fabric scraps.  Plus another for fabrics in waiting.  I can see how people start building up a stash... I also started to use a file folder with several slots to keep patterns in.  GENIUS.

Anyway, in order to start matching my plaids, I turned to the ever smart people at Coletterie and Sewaholic for their trusty tutorials.  They both have different approaches and sometimes one will speak more clearly to me than the other.  In this case it wasn't about which one was more clear, it was simply which one seemed easier!  I went with the tutorial from Coletterie which shows you to lay out your fabric flat, cut one piece, then flip it over and match it.  Cut, flip, match.  Then I switched to the tutorial on Sewaholic, and conveniently Tasia was making a cape too.  Score!  This helped me with my side pieces because they are curved and otherwise wonky.  I'm not entirely sure that my side seams will match beautifully, but the front, back and corresponding side pieces match to each other.  The back mirrors the front, the collar matches the back.  So, I'll look perfect from at least two sides instead of all four.  Also I decided to cut my welt pocket pieces on the bias right on top of a plaid square so I'll get cute little diagonal lines.  Adorbs.  I could tell when I had my pieces nicely matched because they practically became invisible on top of my fabric, as you can see here.
Once I had all of my pieces meticulously matched up, I matched them up with their corresponding pieces of interlining.  I basted them around all sides and like magic, two became one.  I can already tell this is going to be one cozy cape!
I apologize for the poor lighting.  My husband is a vampire.
Bonus!  I finished off my first spool of thread!  Go me!  That must mean I am really becoming an expert.

Once I started sewing together the pieces, I took more care to line up the plaid than to match notches and such.  I am pretty happy with how my matching is turning out!
IZSOPRETTY.
I may have stared at this for an entire night pleased as punch with myself for doing this. Woo!

The Great Cape Adventure

Friday, October 4, 2013

<a href="http://www.bloglovin.com/blog/10923421/?claim=pat5mvgrgy4">Follow my blog with Bloglovin</a>

I never thought I would be ready to make myself any sort of coat or jacket, but obviously in sewing I've been giving myself huge challenges and mostly coming out ahead.  So my next project was a cape coat jacket thing.  To make it even more challenging, I wanted to make it using the prettiest, softest plaid fabric in the universe.

ERMMYGAWD SO PRETTY (source)
This project's sewing challenges:
  • Coats or jackets tend to have lots of complicated pieces
  • Plaid requires matching up the lines
  • Buttonholes!
  • A collar
  • Adding interlining (not in the pattern)
  • Adding a lining (also not in the pattern) 
Whatevs.  I'll figure it out.

I knew I wanted a pretty simple design because a) that keeps things easy for me and b) the beauty of the style should be showcased in the design's simplicity.  Apparently although capes are becoming more mainstream, they're still not super common.  It took much searching to find this pattern:

Even this pattern isn't perfect.  1) It has gun flaps.  Um, no.  Well, okay, that's about all that isn't perfect about it.  What it DOES have that I was looking for, besides the simplicity, are the arm holes.  I didn't like capes that used the sides as arm .. areas .. and sometimes they were pinched together to form a sort of sleeve.  Also, this pattern has hidden pockets.  Who doesn't like pockets?  The arm hole and pocket hole are actually one in the same.  This will take a little extra thinking during sewing, but after going through the instructions I think I get it.

Since the instructions don't call for a lining, this gives me creative freedom to make my own.  I don't anticipate this to be too complicated, but we'll see.  My plaid fabric is a bit thin so I picked up fleece backed satin for my lining for a little extra warmth.  After sitting on this for a while, I decided I still wanted a little extra warmth.  Basically because this should turn out too cute for words and I'll want to wear it as long as I can without freezing.  I did some googling on interlining but wasn't really finding what I wanted, so I just went to Joanns in search of inspiration.  40% of the wandering I do there is for inspiration, 40% is for drooling and imagining all the things I COULD do, and about 20% is actually getting what I went there for.  I wandered around touching things to see what might make a wonderful interlining for my little cape.  I found this stuff, which is absolutely freaking amazing.  It's so, so soft.  It's drapey.  It's glorious.  Okay, it's batting.  What is a cape but a glorified blanket, really?

And thus starts The Great Cape Adventure.  Stay tuned for more!

Renaissance Festival Outfit & Accessories (Round 2)

Thursday, October 3, 2013

Renaissance outfits, as I mentioned before, are ever evolving.  When you go to the ren fest, there's no way you could afford every piece and every accessory that your heart desires all at once.  One thing I always notice when I go are the layers that are worn and how pretty every layer is.  At the ren fest an overskirt will set you back about $55.  I showed you before the double layered overskirt I made.  I also mentioned that I have another corset of my mom's.  This corset is deep purple lined with black (it's reversible, actually, but why would I ever choose black over purple?!).  We have a white blouse and skirt to go with it.  The white is kind of a stark contrast from the black and purple, so I decided to make another overskirt to go with this corset.

I started by doing some internet stalking research and checking out websites selling renaissance clothing.  I decided I wanted to do a lace overlay with gathers.  When I was having my wedding dress altered, I mentioned that I loved dresses that had swoopy gathers, so my seamstress took her needle and thread and gave me an immediate example.  The outcome was perfect.  Two years later, my brain churns up the memory of watching her do that and I figured I would apply the same technique to my overskirt.

I was worried that solid lace fabric would be expensive though.  So I checked out Joann's website and found crafter's lace which was only about $5/yard.  When I went there, I found BETTER lace for $13/yard.  Well, quality vs. quantity I guess.  Luckily I had a coupon (as always!) which brought it down to about $7.50/yard.  It was MUCH softer, drapier, and perfecter than the crafter's lace.  So I justified it figuring that I would use it for quite a long time so the quality was worth a couple extra bucks.
I figured I would take home a couple yards but there was only 1 3/4 left on the bolt.  So I took that.  I wasn't entirely sure what my plan was but winging it usually works out for me.  I also picked up 1" wide elastic for the waist band.  

I brought it home and paraded in front of the mirror to figure out exactly what I wanted to do.  I was going for a simple dirndl style (which is a rectangle gathered at the top) skirt, but the 1 3/4 yards wasn't really wide enough to make a nice shape to go over the underskirt.  Luckily the fabric was 57" wide, which is reeeeeally wide.  So I cut it in half lengthwise and that created plenty of width!  Obviously since lace is see through, I used french seams on the sides to make it look nice and tidy.  I hadn't done french seams before because for some reason they just didn't make sense to me.  I used Tasia's tutorial found here.  Tasia always makes everything nice and straight forward.  Easy peasy, and nice and tidy!

Still with me?  There are pictures at the end!
Then I sewed down a bit of the top to make a casing for the elastic.  On my other overskirt I didn't make a casing because I didn't have the length to spare.  The biggest challenge with this skirt was that the right and wrong side of the fabric was non-existent.  I used the seams to determine which side made it right/wrong and went from there.  Sometimes in sewing you just need to stop and think for a minute to make sure you're doing it right.  Then I sat back on the couch and proceeded to thread my elastic through the casing.  I put a safety pin on one end of the elastic to help do this.  It was slow work because the stretchy lace has lots of holes, so the edges of the elastic kept catching.  After about an hour I finally got it all the way through.  I tried it on to get the right length for the elastic, pinned it again, and cut the excess length.  I sewed the ends together, sewed down the hole I left in the casing for threading, and TADA!  I had a skirt.

Now for the gathers.  I went into the project thinking I wanted several gathers at different length, but I needed a model to figure out where the gathers would go.  Lily is too small, and I can't do it on myself, so I recruited Hubs.  Whatever, he was watching football anyway so be barely noticed.  I put the overskirt and underskirt on him and went to it.  I decided it might be nice just to have one gather like a slit in a dress.  I took my needle and thread and perfected the gather on him.  It really worked out nicely, I don't know how I would have got it so nice if it wasn't on a model.  He wouldn't let me take a picture of it so I had to model it myself.
pardon the crappy lighting
Looks pretty good!  Naturally I needed another matching purse to go with this outfit.  As I was wandering Joanns I found some satiny fabric that was shiny on one side and had a matte texture on the opposite side.  Since I bought 1/2 yard for my last purse and barely used any of it (1/4 of two different fabrics), I figured I could get a whole purse out of 1/4 yard of just one fabric and make use of the different sides.  It worked beautifully.  Since my fabric was a solid color I decided the purse needed to be fancied up.  I picked up some pretty black beaded trim and thought I would try my hand at adding trim.  I'm glad I did this on a tiny purse versus trying to add piping to an outfit.  It wasn't perfect.  This was partially due to the awkward angle and small space I had, plus my purse's opening wasn't wide enough to fit around my machine so I had to hand stitch it.  I didn't think I would like hand stitching, so tedious, but I do think it's pretty soothing.  I also get super proud because I did those stitches instead of some machine.

When I flipped the purse right side out I also decided to understitch the lining so it wouldn't poof out like my first purse.  I also used the understitching to help the beads lay on the outside of my purse.  Like my first purse, I also needed to hand stitch a channel for the drawstring ties to go through.  Once that was done I threaded my string through the channel, and TADA! a purse was born.

Now, finally, a couple pictures of the completed ensemble.


How To Make an Autumn Wreath (for cheap!!)

Tuesday, October 1, 2013

I spend entirely too much time and money at craft stores.  I just love it.  I wish I had more money and time to support everything I want to make.  Luckily sometimes things can be made for cheap.  Like a pretty wreath!

I can't take full credit for this, I had read this blog post at LiveLoveDIY quite a while ago and the idea has been stuck in my head ever since.  I totally forgot that Virginia at LiveLoveDIY had used a lot of supplies from the dollar store, but I also knew that Michaels had a lot of these "picks" for a dollar or so.

So, I went to Michaels and collected my supplies.  I typically prefer Joanns but Michaels does tend to have more of the crafty stuff than Joanns.  I was armed with one 40% off coupon, but luckily all the flowers were 60% off.  The other picks I used were 30% off.  I spent $13 on everything.  Except I went back and bought the ribbon, so like $15 total.
You'll notice that I have scissors in this picture, but don't use scissors.  I realized right away that I forgot the pieces have wire in them, so you'll need something that can cut wires.  I used a pair of needle nose pliers that have a wire cutter on them.  I repeat - DO NOT USE SCISSORS.  You'll also note that I have a frappucino.  All projects require coffee.  Especially coffee sitting next to the coasters.  Genius.

I pulled in purple because for some reason it called to me.  It needed to be the right shade of purple in order to work with the red and orange, but it works gloriously.  I love it.  Also, obviously anything I make requires glitter.  So there's plenty of that.

First I cut up all the pieces on each pick.  I cut each stem about two inches below whatever leaf/flower/glitter ball or at least as far down I could cut if not two inches.  I tried to practice arrange my goods, but they all just fell off, so I just hit the ground running.  See a theme here?  I tend to do that.  It all works out in the end.  Hakuna Matata.  I warmed up my trusty glue gun (I love you.) and first arranged the leaves since they were the biggest.  I would glue one on the left, then work on the right side while the glue was cooling on the left, and switch back.  This method worked out pretty awesome.  I did get some hot glue on my coffee table (don't tell Hubs) but I picked it off before it was totally solid and it popped right off.  So you may want to work on newspaper.  Or, you know, not on your coffee table. 

Then I filled in some gaps with the purple flowers.  I didn't use all of them, just here and there until it looked good enough.  By this time the wreath was fairly well covered, so then it was just a matter of finding pretty spots for the other stuff.  I had a pumpkin, one pinecone, a couple acorns, a few twigs of berries, and several clusters of glitter balls.  I poked them in here and there to find good spots for them to go, pulled them out and covered the stem in hot glue, then stuck it back in real quick.  This half hazard method also worked pretty well.  Again, hakuna matata.  This stuff is handmade anyway, which doesn't always mean perfect.

Once everything was well situated and glued, I spot checked to make sure nothing was going to fall out.  I did kind of use a lot of hot glue (I went through like three sticks. but whatever I love that stuff.) so everything was pretty secure.  I added extra glue to a few of my baubles just to make sure they would stay in their perfect position.  Like I put some hot glue under an acorn to make sure it stuck nicely to the leaf it was resting on.  Stuff like that.  I waited impatiently to make sure all the glue was cooled off, then I looped the ribbon over the top of the wreath.  I thought about gluing it directly to the wreath but I wanted the wreath to have movement if it needed it, so instead I glued the ends of the ribbon to itself.  First I gave it about a foot long loop, but once I put it on my door the wreath hung about to the middle of the door.  This is ok for some people, but I like my wreath a little higher.  So I adjusted the ribbon by gluing more of it to itself.  Finally my wreath was perfect.  And glittery.  So that's always awesome.
Tadaaaaaaa!  Issopreeeettyyyyyyy.  I wanted a glitter ribbon, but for once I actually thought a satin ribbon looked nicer.  It's a little smooshed between my storm door and my front door, but with all the hot glue in there I think it's just fine.  It doesn't look smooshed from the outside.  It just looks awesome.

Wedding Reception Dress - Sewaholic Lonsdale Dress

Thursday, September 26, 2013

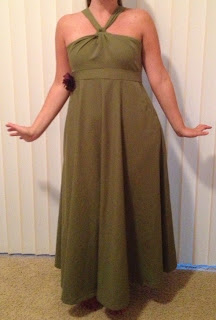
One of my dear friends decided to get married on a beach, so she and her husband had a casual reception with family and friends after they came back.  She was over at my house and we were talking about clothes (surprised?) when she mentioned her search for a dress to her reception.  The gears in my head started to churn.  I didn't think I was quite to the point of making a dress for someone, plus I didn't want her to feel obligated to say yes and then hate the dress she ended up with.  I didn't put the offer out there until after she left because everything is easier by text message.  She said yes!  We chose the Lonsdale dress by Sewaholic Patterns. 
The cool thing about this dress, besides the slash pockets, is that in the front it appears to be a halter but the straps go straight down through loops, then tie in the middle of your back.  This feature not only makes the dress perma-adjustable, it also is much more comfortable than a true halter neck in my opinion.

There were a few firsts for me in making this dress, which is to be expected since I'm still brand spanking new at sewing anyway.  First it had many more pieces than I'd worked with before.  It also had interfacing.  Pockets.  A waistband.  Luckily Tasia at Sewaholic had already done a sew-along for the Lonsdale dress.  All I had to do was follow the steps.  Between the awesome pattern instructions and the sew-along, I have to say this dress came out pretty freaking spectacular.  I even conquered understitching!  I just needed it to be explained in a way that made sense to me.  There are a lot of little features in this dress that I'm particularly proud of, and when I finished the dress I was pretty freaking happy.
  • The bodice is self lined, and the lining is understitched.  As I already said, I finally was able to understand understitching and the finished product is nothing short of exceptional.  I heart understitching.
  • The waistband also has it's own back side, which is slip stitched into place covering the seam between the front waistband and the skirt.  Unfortunately I didn't take a picture of it, but the inside of the dress looks pretty freaking nice.
  • Stay tape is magical.  Tasia used stay tape in her tutorial so I used it too, and it really is wonderful.  I think I'll use stay tape in some other things going forward.
  • Hand-picked zipper.  The dress has a 16" zipper and I installed it by hand-picking it.  Seriously, I'm not sure why I should ever need to install a zipper with topstitching.  Hand-picking is awesome, and a beautiful hand made feature.  I used Tasia's tutorial here.
  • Blind hem.  I meant to hand sew the hem, but I ran out of time.  I still wanted her to have a beautiful dress so I pulled out my sewing machine's manual and figured out how to use my blind stitch feature.  I'm in love with it.  Seriously, this is genius and it looked pretty awesome.
The bride looked beautiful in her finished dress.  I used a lovely moss green linen blend which was supersoft and matched her eye color perfectly.  We added a little fabric flower on the side for fun.
I shortened the bodice more than I've seen anyone else across the interwebs shorten it.  This was my friend's smallest point.  That's the beauty of sewing though, it's totally customized to your body.  None of this trying to fit your body into clothes.  Now the clothes are made to fit YOU!  It's awesome.

Overall, I'm pretty proud and ecstatic with how the dress turned out.  It fits her beautifully, looks beautiful on her, and is a high quality made dress.  That ****I**** made.   There you have it.  The joy of sewing.