Top 5 Hits and Misses of 2014

Wednesday, December 31, 2014

 
What better day than the very last day of the year to reflect on my Top 5 Hits and Misses of 2014?!  I haven't blogged about everything (or most things) in this post, but I still wanted to participate.  Let's start with the #sewingfails.
Actually, I would like to talk about the year a bit.  This year was extremely challenging for me as I went through my first, and very major, surgery which has resulted in a drastic improvement in my health and prompted an ever shrinking Sylvie.  Because of the changes in my body I took some time off from sewing and the projects I made were ones that I thought could later be adjusted. 
Anyway, Hubs and I also adopted a puppy.  We had been wanting a sister for Lily, but my husband had been unemployed so the funds weren't there.  As soon as he was offered a position we immediately cranked the pug search into high gear.  Hubs found a breeder, and we couldn't say no to the most adorable, teeniest pug puppy ever.  We brought Miley home and soon she and Lily formed a deep sisterly bond.  Having a puppy has been a ton of fun!
I also transferred positions in my incredibly boring job, to a slightly less boring job but one I'm incredibly happy to be in.  It really is amazing the effect on your life as a whole when you really are happy in your job. 
Okay!  On to the lists!

Top 5 Misses

5. Sewaholic Saltspring
I actually wore this dress quite a lot, and did find it lovely and comfortable.  The fault is not at all within the pattern.  I will make this again.  However I cut the pieces on fabric that was off grain or otherwise twisted, so the bodice is constantly twisty.  I will note that I made 4 strand braided straps and they turned out awesome.
 
4. Deer & Doe Plantain Top
This top was also poorly constructed.  Apparently I had a bought of bad knit sewing.  Initially the top wasn't super flattering on me, the bust was too tight and I just didn't like it on that much.  The fabric however is really nice.  A rare rayon knit from Joanns, double sided with stripes on one side and polka dots on the other.  You might remember that Mary (Idle Fancy link) made a Lady Skater dress with this same fabric.  Because of the double sided construction of the fabric, it is also a weird knit in that it frays.

3. Lady Skater Valentine's Day Dress

I think I just need to tweak the Lady Skater pattern to flatter my figure better.  Or I could try out Bluegingerdoll's Violet which is sexier (more my style!).  Part of the problem is also the length of the dress.  My former job dictated the need to wear dresses that were at least knee length, which apparently just doesn't work well on my frame.  Maybe if I drastically shorten the skirt, that might make this dress work for me.

2. Vintage Moneta Sweaters

Again, the fault is not with the pattern, but with the sewist.  I made two of these, one in black ribbing and one in grey cable.  The grey cable is another two-sided fabric, and the inside is of an awful acrylic.  This is why it's best to actually read and understand fabric descriptions when shopping online.  Neither sweater has been worn once.  The black sweater does have hope, I just need to remove the collar and simply turn and stitch to finish.  And take it in on the side seams at the waist.

1. Butterick See & Sew B5870 Purple Dress

I wore this once.  While it is a lovely color and the fabric is quite nice, my sewing machine fought me every step of the way when I made this dress.  Looking back I think I may have needed a new needle, or had the bobbin upside down, but this dress is very poorly assembled.  On top of that, I had graded it out in the hips and made really weird side seams.  Overall I felt Fatty McFatFat in this dress and never wore it again.  Maybe one day I will turn the fabric into something else.


Top 5 Hits!

5. Colette Patterns Myrtle
I made a fancy version for a wedding, and promptly made a knit version to wear on a daily basis.  My knit version was adopted into a once a week at work rotation.  So comfy, so adorable, so versatile to wear with multiple colored cardigans.
 
4. Lola Sweatshirt Dress
This dress turned out exactly how I had pictured it.  I was so excited to make it and the dress did not disappoint.  Even though it was a bit big on me at the time I made it, I have still worn the crap out of it.  However I've barely worn it out of the house because my husband says the grey and black colors, along with the simple styling, make it look like a dress right out of Divergent's Abnegation colony.  I don't care.  This dress it stupid comfortable and probably my best constructed item.  It is perfect and I'm very proud of it.  Although now it is much too big to think about wearing in public, I still wear it a ton for lounging.
 
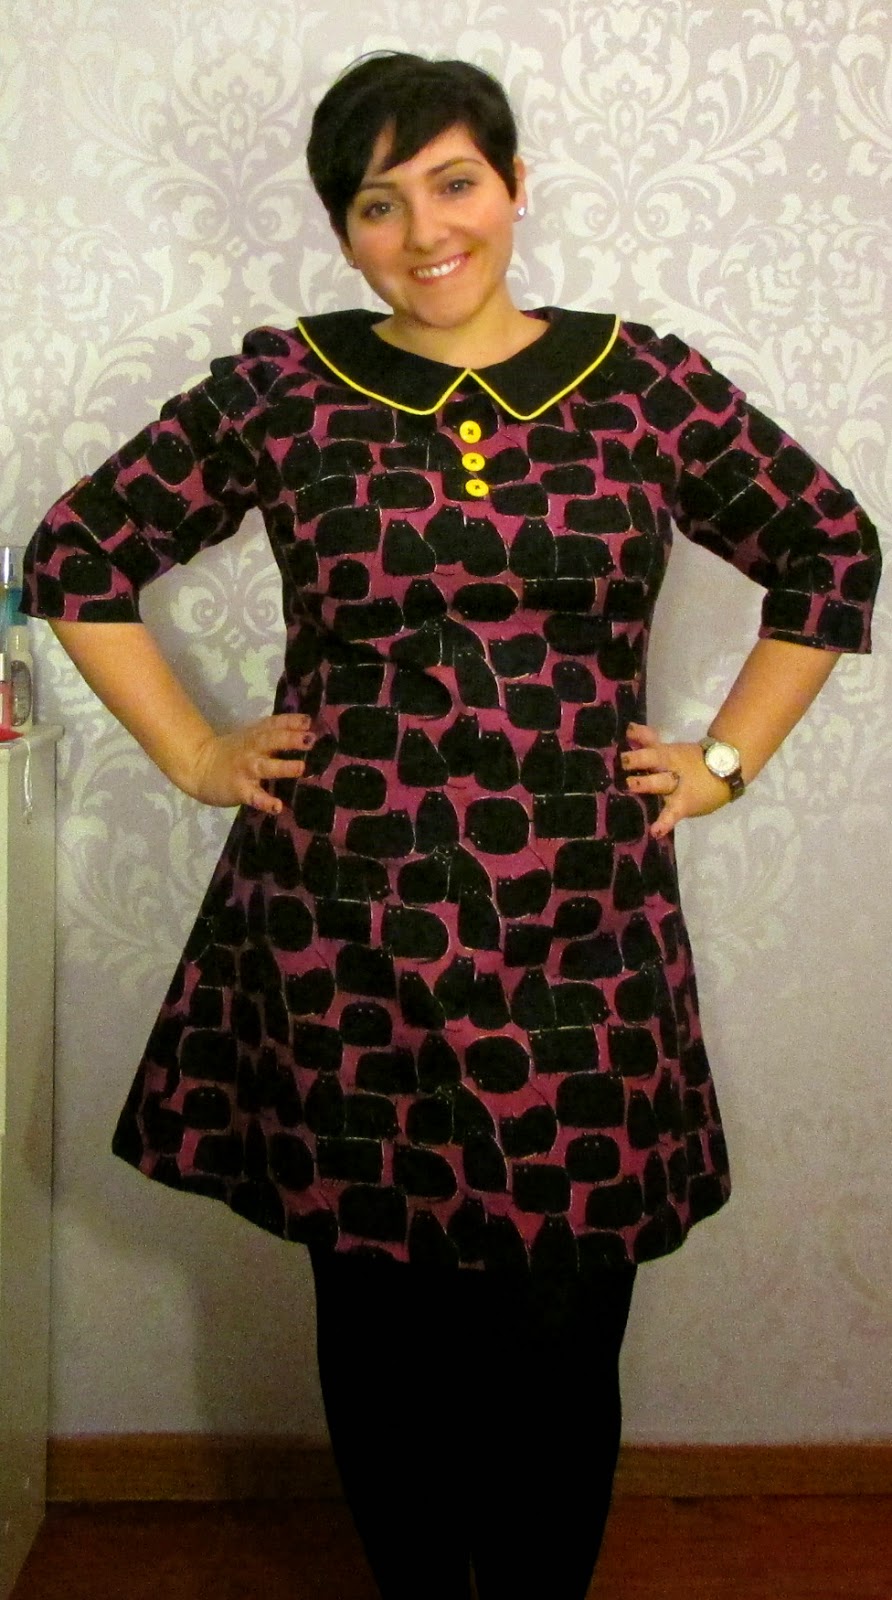
3. Tilly and the Buttons Francoise FatCat Dress
 Ever since I discovered this fat cat fabric, and Tilly released the Francoise dress pattern, I knew it was a match made in heaven.  I had an instant vision of a yellow edged black collar and bright yellow button embellishments on the front of this lovely purple fabric.  The fabric is an homage to my own fat cat, Linux.  The dress came out nearly perfect, and I wear it to work often.  
 
2. The Wardrobe Malfunction AKA PaprikaPatterns Jade Skirt
Despite the wardrobe malfunction I experienced the first time I wore this skirt, I have since fixed (tightened) it and wear it all the time to work.  I feel sassy and adorable when I wear it, and it's the first real mini skirt I've worn in many years.  I adore this skirt.  The fabric, the color, the detail.  I love it.

1. The Perfect Shirtdress - Simplicity 1459
Another item that came out (almost) exactly as I pictured it.  The fabric is perfect.  The pattern is perfect.  The construction is beautiful.  I have worn this dress many times and always get compliments.  The fact that I made it, with my own two hands, is just amazing to me.

Honorable mention:  Tilly and the Buttons Margot Pajamas
 I've barely taken these off since I finished them.  I made them out of flannel and used Lauren's technique of elastic + ribbon in the waistband.  Heaven.

Thank you to Gillian from Crafting a Rainbow for starting this tradition!

The Fat Cat Dress - Tilly and the Buttons Francoise

Monday, December 1, 2014

When Erin, the lovely Miss Crayola Creepy, sneek peek'ed her Cat Lady Sewing Challenge WIP I promptly fell in love with her fabric.
Yes, please.  I instantly saw a vision of cats, yellow piping, and yellow buttons.  I missed the Cat Lady Sewing Challenge, which is lucky for me because Tilly introduced her new lovely pattern, Francoise.
Tilly is one of my favorite bloggers.  She's so sweet and adorable, and I loved watching her on the first season of The Great British Sewing Bee.  She's just a doll!  I love her style and also just acquired her new book, Love At First Stitch.  My vision of a purple and black fat cat dress with yellow piping and buttons suddenly formed in the shape of a Francoise dress.  Complete with black collar, yellow piped edges, and too cute for words buttons down the front.

Tilly also announced a contest.  Well okay then!  This is the first time I have participated in any sort of sewing challenge or contest, and I'm extremely pleased with how my dress turned out.  It is *exactly* how I pictured.
#SewingFrancoise
This is my first time successfully sewing piping, as well as a successful collar.  I'm pleased as punch.  Am I bold enough to wear a cat dress in public?  Why yes, yes I am.
This dress is an homage to my very own fat cat, Linux.

Paprika Patterns Jade Skirt - The Pinterest Skirt!

Thursday, November 13, 2014

Quite a while ago I found an ADORABLE diagonally pleated knit skirt on Pinterest.  I promptly pinned it, quickly scanned the instructions online which I deemed it too complicated for my tiny head, and continued to pine for it from a distance.
(Picture sourced from Pinterest)
Lucky for me, Lisa turned this highly pinned skirt into her first released pattern via new indie company Paprika Patterns.

The Jade Skirt pattern is available for a price that YOU determine, including free.  I believe Lisa originally planned to have this available as a free pattern, but the project evolved and turned into a company and her sole employment.  I love to support indie pattern makers so I was happy to pay for the pattern.  I'm also happy to share the word, because I have a major crush on this skirt.  It's completely adorable, enviable, comfortable (knits = secret pajamas!), and did I mention - COMPLETELY ADORABLE.

I recently had a day off work that I planned to ~SEW~ all day long.  A glorious day to look forward to!  Since this is the initial release for Paprika Patterns, the pattern does not come in the full size range that it will be available for in the future.  I have lost a significant amount of weight, but I was still on the cusp of the size range:

Size Chart (Inches)


123456
Waist24.52627.52930.532.5
Hip3435.53738.54041.5

Good thing I'm a renegade seamstress, because I recklessly slashed and spread the pattern and added my necessary additional inches.

So, funny story.  I added about two inches to the overall width of the skirt.  As I was fitting the skirt on myself, I had to take out about the same amount that I had added.

Funnier story.  I finished the skirt within an afternoon, and had a haircut scheduled in the evening.  It was so cute and adorable and comfortable that of course I wore my new me made skirt to my appointment.  I gushed to my stylist about how I spent all day sewing this adorable skirt and we fawned over the adorableness of the skirt.
After my appointment my stylist and I were walking to the register.  Suddenly I feel a sort of constriction around my ankles, as if I had left the bathroom forgetting my undies around my ankles.  Except instead of my undies, it was my skirt!  We both got quite a laugh out of my wardrobe malfunction, luckily I was wearing some heavy duty tights due to our chilly weather.
Obviously I need to take it in even more.  My knit, although fairly stable, probably also has a fair amount of stretch which contributes to how the size feels.  Anyhoo.  The construction of the skirt seems complicated, but there is a video on the Paprika Patterns website to assist.  The pattern also includes a scaled down version to practice.  After watching the video and using the practice sheet, it really isn't that complicated.  I used color coordinated pins when constructing my actual skirt to indicate my folds.  The skirt is fully lined, so all raw edges are neatly concealed and contained.  The pattern prompts a mid-construction fitting to ensure a nice fit.  (Note, if you plan on wearing tights with the skirt, you may want to also wear tights while fitting to avoid any similar wardrobe malfunctions. Learn from my mistakes.)  I cannot say enough how adorable this skirt is.  I felt so sassy and put together when I wore it.  I can't wait to wear the hell out of this skirt, as soon as I take in the waist a bit!


Simplicity 1459 - The One With The Perfect, Gorgeous Shirtdress

Tuesday, November 4, 2014

You guys. I'm seriously impressed with myself! My construction is getting pretty damn good. See: Simplicity 1459.
I came across this pattern through the lovely Tanya Maile. I've always loved shirtdresses and have long quested for one that fit and flattered me. No such luck. This is why I sew. Combine the perfect pattern with the perfect fabric and you've got the perfect dress! I instantly knew I wanted to make this dress in a royal blue cotton sateen. This would make my eyes like POW! Enter, this gorgeous and perfect fabric:
(Now unavailable on fabric.com. Also, this is the true color. It's awfully hard to photograph.)
I found this on fabric.com and it was exactly what I was looking for. The planets aligned and this dress was destined to beautifully grace my body. When I received my package I was even more thrilled. It has just the right amount of stretch and the color is incredible. Plus, tonal dots! Even more perfect.

Then... Life happened. I bought the pattern and fabric for my birthday, in August. In September I worked on my Princess Peach costume. Apparently it took the whole month. I was cautious because being the same brand, I was worried about picking the size of the garment. I finally got around to tracing the pattern and making a muslin. I didn't realize the sleeves had darts at the elbows, but I gave it a shot. The bodice fit fine, but the sleeves were way too tight. So I used sleeves from another pattern instead, since I didn't care about the elbow darts anyway.

One thing I hate doing is gathering, and the skirt requires lots of gathering. Luckily from my Princess Peach costume I had already practiced my work around! I think I picked up the tip from Gertie, but I sew a long and wide zig zag over a bit of string. I happen to have a ball of string in my stash! This trick is miraculous. Gathering is so much faster and honestly I think it actually does a better job too. Just pull the string when you're ready to gather, and blamo! You've got lovely gathers.
I was also quite impressed with how the collar turned out. My tips aren't perfect, but the collar as a whole looks pretty good. I worried the collar would overwhelm my small frame, but I didn't make any changes to it and I think it looks good. I hand picked the lapped zipper and am in love with how beautiful yet camouflaged the zipper is.
Sorry for the flash!
My biggest issue with the dress is the buttonholes. First though, yay for my first (non-bound) buttonholes on a garment! Go me! Anyway, I'm pretty sure I marked their placement correctly per the pattern but it seems they could be in better locations. I also would shorten the bodice a bit because the weight of the skirt brings it a bit low on me. I meant to use hem tape when finishing the skirt, but it seemed sooooo fiddley so I just pinked the edge and did a catch stitch hem. I like that better anyway.
All in all, I'm very proud of this dress and I'm totally in love with it. I wore it with my petticoat made last year. I'm ecstatic with how this dress turned out!

Disney Princess Goes Princess Peach - Simplicity 2813

Wednesday, October 8, 2014

Generally speaking, my family and I attend Mickey's Not So Scary Halloween Party at the Magic Kingdom in Orlando every year. 

Mickey's Not So Scary Halloween Party 2007
Our first MNSSHP. Obviously I'm no stranger to Princess costumes.
This year my mom and my sister are dressing up as Mario & Luigi, so naturally being the princess of the family they voted me to be Princess Peach. I knew I wanted to sew myself the costume, and a quick google search lead me to Simplicity 2813.

Simplicity 2813
 
Meant of course to be used for Disney Princesses Snow White or Cinderella, but it just so happens that Princess Peach's dress is incredibly similar in style to Cinderella's. Just a switch up of the colorway and you've got yourself a Nintendo Princess.

Princess Peach
Instantly I began plotting my dress and became ridiculously excited about sewing myself a Princess dress. Well, duh. I thought I would use glitter organza for the contrast pieces, but instead I used a shimmery organza since I couldn't find the glitter version. I also picked up some uber cheap pale pink costume satin for the main dress, fully anticipating it to be a nightmare to sew.
 
The pattern instructions either assume you just know to do certain steps, or my skillz have gotten so damn good that I've just set a higher standard for myself. The pattern barely tells you to press anything, much less to finish any seams. It's entirely possible that they don't tell you to because 1) you are likely going to wear this outfit once or twice, and don't need it to hold up well, or 2) because the bodice is lined they figure you don't need to finish your seams. For this reason I wasn't going to line it, but then I thought cotton would feel much better against my skin than cheap polyester. So things I did to bump up the quality were to press my seams open, press my darts toward the sides, and pink all my raw edges. Pretty standard things that weren't included in the pattern instructions. If I really wanted to be awesome, I could have understitched the lining too but the muslin I used to line the bodice took a pressing pretty well. I don't think I'll have any peekaboo lining issues.


I shortened the skirt by 16" to bring it up to tea length. I plan on wearing a petticoat with the outfit to boost the Princess factor. Plus, petticoats are just plain awesome. I shortened the bodice by 1/2" and used the smallest size for the neckline dip and strap widths, just because I tend to be small in the shoulders and I find patterns often make necklines too conservative for my taste. The costume satin surprisingly was not a nightmare to sew, though it does fray like the dickens. It also makes an awful sound while being sewn, like my needle is perforating the fabric. Which, it probably is. We'll see how the dress wears. I have the Halloween party as well as a Halloween ... party ... like a real one. Florida will likely be hot and schewtty, so the costume will probably go through a gentle washing between them.  Luckily I've got a wonderful bottle of Soak handy for things like this.
Dad came too.
In the end this costume turned out pretty sweet, albeit REALLY BIG.  I didn't want to redo the entire bodice, so I had Hubs pinch in the excess from the back zip.  I ended up taking out 4+ inches from the back, grading to zero at the waist.  If I had taken it in at the waist I really would have needed to redo some things since the overskirt puffs were already nicely sewn in.  It fit okay at the waist anyway.  The bodice front still gapes, a lot.  I'm only going to wear this costume this year so I'm just going to leave it as is.

One thing I am happy about is this was my first lapped zipper.  I've read tutorials but they still seemed confusing.  Funny that I should learn something like how to do a lapped zipper from a Big 4 pattern.

So. Much. Fun!

Cake Patterns Hummingbird Flounce Skirt - UFO

Monday, September 15, 2014

I have wanted to make a Hummingbird skirt for a while, but I wanted to get through my current list of projects first.  As you may recall, I wrote about making a Hummingbird peplum top.  Which I did.  But ... something about it is ... off.  I've put it on a couple times, modeled for Hubs, and he says it's "fine".  Well, for some reason I don't feel like it's fine.  I think that the front waist raises up too high, and the back waist is too low because the front is raised by my chest dwellers.  So I needed to compensate for that.  For now, it's just a finished top that sits lonely in my dresser.  Cue lone violin.

Since I'm not making a coordinating Hummingbird skirt for my top, I realized that I could really use a nice black skirt for work.  Lightbulb!

I wanted to find black cotton sateen, but of course Joann's website LIES and my store didn't have or couldn't find their bottom weight black sateen.  There was grey, purple, and some other colors.  But black?  No.  Sad face.  I'm pretty sure the one I picked up was a Sew Classic Bottomweight Wrinklease.  I needed something that wasn't demin so it was work appropriate, and I wanted a dressier look.  This one has a soft feel to it so I picked it up.  Unfortunately it's only 44" wide, and it's a whore for lint.  Awesome.  I asked the cutting counter for 2 1/2 yards but there were only 2 left on the bolt.  I was still charged for 2.5.  Not that I'm bitter.  Knowing I would likely wear tights with this skirt, I also picked up some Ambiance Lining which is woven with magic and feathers.  I bought it in Blackberry, a nice deep purple, just for a fun little secret inside my pants.  Hahahaha.  Okay, let's move on from that now. 

Now my trick was to squeeze a Hummingbird skirt (with flounce) out of a measly 2 yards of narrow fabric.  I shouldn't have needed more than 2 yards, but that's on 60" width.  I said a prayer and started cutting.
Yes, I cut on my floor.
I did make it, but my waist band couldn't be cut on the fold so I have a seam in the middle.  Well, whatever.  I never wear shirts tucked in anyway.

I then had to cut most of the pieces again out of my lining fabric.  Instead of a true lining, I actually underlined all of my pieces.  Since the skirt is more form fitting I thought this would prevent any annoying wrinkles between the layers.  This also allowed the flounce to be underlined as well.

I proceeded to baste all of my lining pieces to my outer pieces.  Then came construction.  The first part to construct are the sides with the pockets.  Let me tell you.  I felt like maybe I am not good enough for this, because I could not understand how it went together.  I stared at it, willing the pieces to tell me their secrets of how to go together.  I read over the directions some more.  I made sure my pieces were all in their proper alignment, because the top side skirt has faint shaping to it.  I finally just dove in, as per the usual, and it all worked out.  As per the usual!  In the end, the pockets are really quite a cool construction.  And just like Steph says, you can take in the side seams and the pockets still retain their shape.  It's beautiful construction.

I hand picked the zipper because they are awesome.  I struggled a little bit with finishing the waist band during the stitch in the ditch process.  I stitched in the ditch, but the stitches did not fully catch the waist band on the inside.  I took it to work and finished the interior with some hand stitching.

Gorgeous.  Just look at that!  It's so freaking pretty.  I'm getting really good at this sewing stuff.
I didn't bother with measuring length but I should have.  As soon as I tried this on I realized it was far, far too long.  So ultimately this has ended up being a UFO.  It's quite sad and at some point I want to take it apart and see what I can do to save it.

TEARS. :'(

News!

Just to cover some "administrative" tasks, I've recently had surgery which kept me down for a while, and I've been losing weight very quickly which makes selfish sewing difficult when I shrink out of clothes within weeks! I've finally started to sew again and feel like I've come back to my happy place. I've been making things that can be easily altered to accommodate my on-going weight loss.

With that said, I've fallen IN LOVE with both of Colette Patterns' Myrtle and Moneta dresses! To welcome the coming Fall, I've also sewn the ultimate in cozy, a Lola dress by Victory Patterns. Let me say, I can definitely tell that my mad skillz have advanced. Not only did the many and complicated looking pieces of Lola come together like a breeze, my seam matching is BEAUTIFUL. I far exceeded my expectations of myself here!

In addition to my mad skillz, I've decided I really need to advance my photography on this blog. So I'm digging out our DSLR and becoming friends with it. Wish me luck!

Book Recommendation & Giveaway!

Tuesday, August 19, 2014

My dear friend, Maria, has had her book published today! Check out this gorgeous cover!

Here is the description of In The Rearview:

When Meagan’s secret is found out, and she realizes there is no way to outrun her habit of cutting, she tries to work through it, and her depression, before she cuts too deep, making a mistake that can never be undone.
Meagan's problems aren't like every other adolescent's no matter how much she wishes they could be. Hers are worse. They've pulled her down into the depths of a depression that is anything but normal. She begins her pattern of self-harm as her depression threatens to drown her. She starts with one cut that leads to the next, and the next. After starting, it's apparent that there's no stopping, and Meagan spirals into a dark and cruel world she doesn't understand. Meagan cuts to feel better, but that comfort doesn't last long enough, and soon life is worse than it ever was before.
While learning to quit cutting Meagan faces life-altering obstacles and grows up in the process. IN THE REARVIEW is a story of pain, loss, confusion, and hope told through Meagan’s poems, journal entries, and a splash of narrative.
Maria is a very dear friend of mine and I can't wait to read her book! Maria Green currently lives here in Minnesota, despite its bitter winters, with her husband. She graduated with a degree in Psychology and a minor in English. When she isn’t writing, Maria loves to read with a cup of strong coffee or a glass of sweet wine, craft, and spend time with her family. This is her first published novel. I'm so excited for Maria and encourage you to download the eBook! 
Speaking of... anyone who buys this book, in any e-version the first week it's out, August 19th - 26th, and sends Maria an email verification (screen shot your purchase confirmation, forward the confirmation email, take a picture of your computer screen - whatever works) will be entered into the drawing to win a pretty cool set of prizes. Send the emails to: magauthorgiveaway@gmail.com
There will be three winners. If you win there are a few things you will be getting. First, you will receive a gifted copy of Maria's next published book in any e-version that you prefer. Second, because there is poetry in this book, Maria will write you poem that is specifically for you. The winner can feel free to provide personal information or likes to make the poem more specialized, but that is not required by any means. Third, Maria will name a character after each winner in her next book. She says she cannot guarantee that the character will live, or be a good guy, but the winners will get to be a character in a manuscript! Fourth, and finally, each winner will get a mention, by name, in Maria's next acknowledgments page. 

You can find Maria Green on the web and social media:

Go forth and read!

Misc Shenanigans

Monday, March 24, 2014

Hi readers!  My sewing queue has been quiet for a little while, let me explain what's up.

First I went on a glorious and overdue trip to Florida to visit my family.  I got to spend time with the mouse, not to mention sunshine, and it was wonderful.

When I got home, I promptly came down with The Epic Cold of 2014.  I was miserable for another week.  Like, not a few crappy days and a few not great days, but I mean a full week of super craptacular days.  It wasn't fun.  I'm still coughing up a lung.  Being on the mend is exhausting, and I can't say I've wanted to do much besides lay on my couch.

Finally we reach today.  I have recovered some energy and my brain has cleared enough that I can function again!  However, there is another issue on the horizon.  Due to personal adventures coming up this year, I am cutting back on selfish sewing.  I am looking for projects to do for other people and have offered my services out to Facebook friends and family.  I have a couple bites, so hopefully something will come of those!

In the meantime, I still have a Coco on my to-do list.  I have the pattern, fabric, and even thread.  I just need to get around to making it.  I'm basically copying the gorgeous aqua funnel neck version that Tilly models.  So pretty!  Retro!  Yay!!

Also, now that Spring is around the corner I can finally start to think about making my Jasmine top again.  Last summer I bought pretty turquoise with white polka dot fabric from Gertie's Etsy shop and a nice white cotton for the contrast pieces.  I love the design but honestly I'm a little nervous that once I make it I will never wear it.  I'm anxious that it won't fit me properly.  I guess that's the point of sewing and fitting.  I should probably make a muslin first to check the fit.  Yeah.  That would be wise.

My mom and I on the monorail, on our way to the Magic Kingdom!

Making a Frame Bag

Tuesday, February 25, 2014

A friend of mine saw on Facebook that I've been sewing up a storm and asked if I could sew together a frame bag for his bike.  Sure, why not?!

Google, of course, is a wealth of knowledge and he had already done a lot of research and knew what he wanted.  I had him make a card board cut out of the space where this bag could go.  He actually went about five steps further and indicated exactly where the zippers should go and where the velcro should go.  After a quick meeting I was able to get all the information I needed to make the perfect bag for him.

With the cut out I was able to create pattern pieces on Swedish Tracing Paper.  I then made a sort of muslin of the bag not only to make sure I was competent in assembling this thing, but also to measure how much fabric we needed.
I have to say, I'm pretty happy with how it turned out.  I used a new technique illustrated in a book my mother in law gave me for Christmas to make a darted inner pocket.  This created a pocket with depth so things like a cell phone and keys.

I used Cordura 500 Denier fabric and heavy duty sport zippers.  There is 2" velcro on all sides for him to attach the bag to his bike.  My friend requested three pockets, the small one I mentioned above, a large main pocket and a lower pocket for tools and such.  Some frame bags have a velcro piece to separate these pockets, but he didn't need to have the option of combining the inner pockets.  My friend also requested a nice patch to be attached on either side for a bit of personalization.  I wasn't sure if my little Brother could handle this, in addition to the thick Cordura 500D fabric, but it handled like a dream.  All is takes is the right needle!  (With this knowledge, I just might revive my Haunted Mansion purse!)  We purchased most of the supplies from rockywoods.com.

Wanna see pictures of my masterpiece?!
Look how bravely he faces the snow!
Get me from my good side, darling.
Another addition I made to the bag was I lined the side panels and slipped thick pieces of foam between the layers to provide structure to the bag.  I am mighty proud of this bag.  I truly hope it is nice and durable, but time shall tell.  My friend also sent me a picture of the bag uniting with it's life partner:
Yes.  This I am proud of.  My friend has updated me to let me know the bag held all his belongings nicely during a long winter ride.

Yay!!

Cake Patterns Cabarita Top!

I've been eyeballing the Cake Patterns Riff Cabarita top for a while.  I already bought this adorable tonal knit from Girl Charlee just for this shirt.
I'm in love with this fabric.  It's gorgeous.  The color is hard to capture in a photo, so this swatch from Girl Charlee is the most accurate.

Cake's Riff pattern line is a condensed version of a pattern.  Simple instructions, plus the pattern.  Previous experience with knits (even better, experience with Cake Patterns) is recommended.  I wasn't 100% sure that I qualified for the project, but it didn't include any new techniques so I figured I would be okay.

Cake Patterns has an innovative sizing method where you basically trace your own size.  This keeps fitting adjustments to a minimum, which I think is pretty damn cool.  The bodies of women vary so widely, in size and shape and length and dimension, really Steph's patterns are quite genius.  This is exactly why I started sewing.  My body is so uniquely shaped that it can be hard to find off the rack clothes in the styles that I want.  Sewing allows for full customization.  What's not to love?

The only issue I had in making this top was attaching the collar.  Generally you pin right sides together, sew, then the seam gets tucked inside.  However the collar "rolls" and I was a little confused.  I think I did it right in the end, but we'll see how it wears.  Since my fabric is pretty lightweight I did add a lightweight interfacing to the collar.  I also handsewed a few tacks to keep the collar and the seam in the right place.  The collar is understitched to prevent the seam from rolling to the front, but I think the weight of the collar kept pulling it out anyway.

I also realized when I switched to my twin needle that I had been using my universal needle instead of a ballpoint.  Which explains why the stitches are a bit weird.  But, whatever.  It seems to be okay for now.

All in all, I made a top that is freaking adorbs and I love it!  I haven't gotten around to taking a legitimate picture, but I was growing impatient in posting this so here is a photo of me at work.  Here ya go:
I love this color so much that I bought a solid version for Tilly's new Coco pattern!

Kitchen Makeover (Or How Not to DIY Chalk Paint)

Wednesday, February 5, 2014

 **We interrupt your regularly scheduled sewing blog post to bring you a post about a DIY project!**

Hubs and I bought our house last May, and I've HATED the color of our kitchen ever since we moved in.  We also have not been huge fans of the 80s Oak cabinets, but remodeling a kitchen is a HUGE expense.  So we decided to paint!  First, here is a before picture.

ACK! I hate that stupid blue.
(and yes, our christmas tree was still up thankyouverymuch.)
I've had paint chips up on the cabinets basically since the day we moved in.  So I revisited those colors, did some googling, and found all new colors.  We knew we wanted a wine color somewhere, and we had agreed we liked black cabinets.  Do you know how hard it is to find the right wine color?!?!?!  Then so many shades of black ... it's insane!  We (I) finally narrowed it down to these two gorgeous colors:
Benjamin Moore Crushed Velvet (in Satin) and Toucan Black (in flat).  I chose Toucan Black because it is a more complex black with purple tones.  It's gorgeous.  I saw Crushed Velvet and fell in love instantly.  The two together create magic.  It only took a couple days to make the final decision to go with these, then we dove right into the project.

Even before we moved into the house I had been looking at Chalk Paint for the cabinets.  Chalk paint sticks to anything with no prep or sanding, and (is supposed) to have a really unique to touch finish.  So I sent Hubs to the store to pick up Plaster of Paris so we could mix up our own chalk paint. I gave him a tutorial from the blogosphere and he did all the mixing and most of the painting. 

Enter #craftfail.  Now, I can't completely say that it was a fail because we actually love the final result.  But we're not entirely sure that the Plaster of Paris actually did anything.  Since we started with a flat finish paint, it was hard to tell if we also had the chalk paint effect.  I've never seen chalk paint in person I had no base to go off of.  What we did know was that we would paint the whole day, then find all the Plaster of Paris sitting at the bottom of the bucket.  Hubs had used some of this gritty paint before we realized what had happened, and he ended up having to sand those pieces down because it was like we had painted rocks on our cabinets.  Yuck.

So, I think our cabinets are not really chalk painted.  But we both love the flat, matte finish.  I had googled up and down how to seal or finish the chalk paint, and we all know that chalk paint is typically finished with soft wax.  But apparently waxing is not only a pain in the ass (especially on an entire set of kitchen cabinets), but it also can change the finish.  On top of that, it's not super durable for kitchen use and has to be re-waxed kind of frequently.  We are low maintenance type people, so that didn't sound very appealing to me.  It's important that we can wipe off the cabinets because Hubs SOME of us tend to make a mess in the kitchen when they we cook.

Enter problem #2.  We liked the flat finish and polyurethane usually comes in various levels of shiny, completely canceling out our lovely (and intentional) finish.

Enter solution!

I googled matte poly and found that there ARE flat finish varnishes, but almost no reviews on them.  

Enter reckless Sylvie!

As you should know by now, my method is part tutorial following, part just go with it.  I found Varathane has a polyurethane in Matte, with a special "soft touch" finish.
So, I dove in and bought the stuff and we slathered every inch of our kitchen cabinets in it.


**The heavens open and angels sing**


Guys.  My kitchen looks amazeballs.  Wanna see?
Yeah!  Tell me that's not sexy!


We also took off all the yucky brassy handles and grabbed some trusty old Rustoleum Paint+Primer spray paint along with a cardboard box and took those bitches outside.
We used the Dark Steel color and I think they look pretty freaking awesome.
whatever, I was too lazy to take a picture of my own can.
We also decided to paint our kitchen step stool in it, which is currently drying so there is no picture yet.


Huge props to Hubs for doing SUCH an AMAZING job!  It's incredible what a little paint can do to completely transform a kitchen on a limited budget.


To sum it all up, if you've been considering painting your kitchen cabinets, DOOOO IIIIIIIT!  You will never look back!