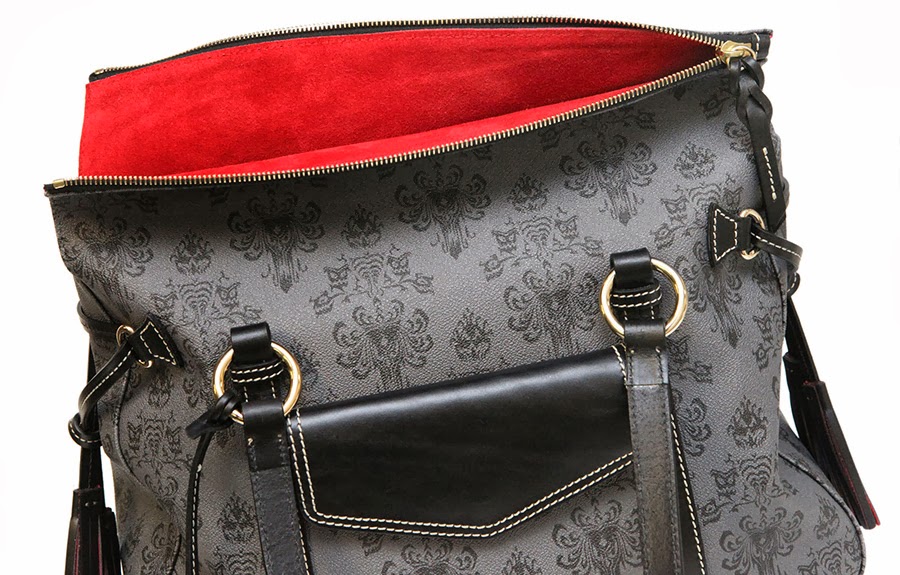
Dooney & Burke Haunted Mansion Inspired Purse

Tuesday, November 26, 2013

It has been suggested to me that I make purses.  I've already made two little bags for the Renaissance Festival, why not keep at it?

So I did some googling research on it and drew up a design for a super cute purse for myself.  It was going to be grey corduroy and totally adorable.  I was looking at fabric to line it with when I had a sudden inspiration to imitate a purse that I.Am.In.Love. with.

The Dooney & Burke Haunted Mansion purse.


Now, I've never been one for labels.  Especially ridiculously priced purses.  #sorrynotsorry.  Then came this one.  So dark.  So beautiful.  So unique.  I need it.  I need it despite the $330 price tag and likelihood of it always being sold out.

I started to draw up a design I knew I could make.  I googled how to do a few special things to up the oomph factor.  I had decided on a black on black damask print fabric for the interior of my grey corduroy purse when I realized it actually would be perfect for my own version of the Haunted Mansion purse.
Yep.  That will do.  I picked a bright red broadcloth for the interior, and black sateen for the straps. (Leather straps are like, $20 for a set.)  The next step is to turn my drawing into pattern pieces on swedish tracing paper, then it's off to assembly!  SOEXCITED.

The Great Cape Adventure: Finished Product

Thursday, November 21, 2013

The moment you've all been waiting for ..... the finished cape!

I had Hubs take some pictures of me with his fancy camera.  So warm and cozy!

It was a beautiful day too, probably one of the last lovely days of Fall this year.


The last couple of pictures are to show how the arm hole and interior pocket are one in the same.  It's pretty hard to visualize this with just the pattern description!  The coat is very warm and cozy, and I've received several compliments on it!  I just love how unique it is.  Maybe next year I will muster up the courage to make something like this:
Hello, Adorable!!!  Can I do this?  HELLS YEAH I CAN DO IT!  Okay, ready to see some new stuff??  On to the next project!

The Great Cape Adventure: Drafting A Lining

Tuesday, October 29, 2013

I went into The Great Cape Adventure knowing I wanted to line it for extra warmth.  What I didn't expect was the desire for it to look so pretty from the inside too.  And let me tell you, boy, does it look pretty.

When I don't know how to do something I generally do a combination of winging it and seeing if people smarter than me have put instructions on the interwebs for me to follow.  Most of the time this combination works out pretty well.

My pattern didn't come with instructions for a lining, so I sort of followed the tutorial written by Tasia on Tilly and the Buttons.  Since my pattern doesn't have sleeves, and mine does have a collar, I modified the instructions to fit my needs.  Sewing is all about bending the rules, right?

I traced my original pattern pieces onto Swedish Tracing Paper and used Tasia's instructions to draft the lining pieces.
I know.  This picture sucks.
The original pattern pieces are in blue, and where I made modifications to where I actually needed to cut are in pink.  I also made sure to transfer over other markings, like the circles for the pockets because I wouldn't want to cover up the pockets I worked so hard on!

The pockets were also a difference from Tasia's tutorial because I needed to use the same seams due to those pesky pockets.  So my lining had four pieces instead of her two.

I cut out my new pattern pieces, labeled them accordingly, and sewed up my lining.  For the hand/pocket holes, I cut into the fabric at the holes and did a turn and stitch approach to create the space and take care of the raw edge.  Also, since my jacket already has a pleat, I added an extra inch to Tasia's recommended 1" to make sure I have plenty of wingspan for hugs.

Once I had all my lining pieces attached at the proverbial hip, I lined up the collar and the top of my lining right sides together.  Oh wait!  This is where I added my hanging chain.  Tasia had used a tutorial that she linked to quite a while ago, but when I went to the link the blog was gone.  So, I winged it.

I picked up some grosgrain ribbon and a bracelet/necklace making kit.  I used two jump rings and a length of the bracelet, cut two pieces of ribbon about 2" long, folded them in half (for extra strength) and pinned them in place.  While sewing the lining in place, I made sure to go over the ribbon ends lots of times to make sure they don't pull out. 

Since my cape is kind of an awkward shape all around, the lining that attaches to the collar was the only part I could sew by machine.  I went down each side and methodically hand stitched the lining the the facings.  I slip stitched the pocket opening to the pocket holes and welt flaps.  Finally, I folded the bottom edge under and slip stitched to the seam line.  I did this to create vertical ease in the lining.  If you look at the inside of a lined jacket, you will see that the lining either has a fold at the bottom, or the lining hangs free and is tacked in at a couple select spots, like the seams. 

ITZSOPREEEETTYYYYOMG
And then .... drum roll please .... A FINISHED CAPE!!!!!!  Photos to come.

The Great Cape Adventure: An Almost Finished Cape

Tuesday, October 22, 2013

I've spent a large chunk of time avoiding chores sewing this lovely cape, and it's almost done!  Soon I'll be able to prance about in it while feeling snuggly warm.

I finished matching up all the pieces together.  This wasn't a particularly easy task.  My hang up was matching the sides together and eventually I gave up and hoped for the best.  I lined up the front and front side pieces, then the back and back side pieces.  When I put them all together they magically lined up on the sides too!  I guess I'm a pretty awesome plaid matcher.

My next step was putting in the facings, but I knew I wanted to try my hand at bound buttonholes so I needed to do that first.  I used Julia Bobbin's tutorial (she.is.awesome.) which was the most comprehensible bound buttonhole tutorial I've seen.  Seriously, why is everyone else making it so complicated??  Julia even included how to make facings with little matching windows for the buttonholes.  I did one practice buttonhole and it turned out pretty awesome.  So I made four more on my actual fabric.  Omg scary.  Cutting into my beautiful precious fabric!  What if I screwed up!  What if they are ugly!  Well, whatever.  Buttonholes are usually covered by buttons anyway.  But!  They turned out beautiful.  Now I'm looking at off the rack coats judging their quality on whether they have bound buttonholes or not.  (My gorgeous wool coat from Gap does.  Their current selection does not.)
I sewed on my collar and, of course, buttons, and TADAAAAAA!  My cape is ALMOST complete.  I just need to hem it and add the fleece backed satin lining, which is my own addition to the pattern.  I'm also going to add a hanging chain because if I'm going to be awesome then I need to go all the way awesome.

I am pretty sure the plaid isn't really crooked in the back.  Just call me Quasimodo.  Okay don't, because that would make me sad.  I also thought our living room was actually bright at the time I asked Hubs to take these pictures.  A fool I am!

***Bonus pug picture!***  Because she is just so cute.
My little snoring sewing friend.

The Great Cape Adventure: Stitch, Rip, Stitch.

Tuesday, October 15, 2013

I had my first epic sewing fail on The Great Cape Adventure.  I was following my directions swimmingly, quite proud of my little pocket entry edging, had beautifully slip stitched the inside piece of my pocket bag to the pocket hole, basted it to my cape, then perfectly top stitched the pocket bag in place.  I basted my welt flap in place, sewed my front and side pieces together.... and bam!  Something felt wrong.  I went to work the next day googled on my own time pictures of welt pockets and other finished capes.  I learned my welt pockets are special and the general rules do not apply to my cape.  I studied pictures.  Then it dawned on me.

I put the pockets on the wrong piece.
Well.  Crap.  The pockets are to be attached to the front pieces, and I attached them to the side pieces.  I made my perfect pocket openings and cut into my beautiful fabric on the wrong side.  Now it makes sense that when I sewed the front and back pieces together with my welt flap in place, the hole and pocket didn't really flow.

Ahhhhhh.

Well, that's okay.  It had to come sometime.  So, I spent the next evening carefully ripping out my perfect stitches.  Since I had already cut into my fabric to make my pocket opening on the wrong side, I needed to improvise in order to fix it.  Luckily this turned out easier and lovelier than I could have hoped.  Maybe even better than the original instructions!
I sewed the welt flap under the original pocket opening that I had made.  I correctly installed the pocket bags on the front pieces.  Sewed together the front to the side front, and TADA!  Now the welt flap lies perfectly over the pocket hole, while also allowing one's arm out from the cape.  That might not make sense, let me explain.  The arm hole and pocket hole are one in the same.  But the pocket hole gets covered by the welt flap where the arm comes out.  Follow?  Okay.
So.  Lesson learned.  Don't watch Breaking Bad while trying to read weird pattern instructions.  You'll likely become BFF's with your seam ripper if you do.

The Great Cape Adventure: Plaid Matching & Interlining

Tuesday, October 8, 2013

Continuing on The Great Cape Adventure, I needed to figure out how to match plaid.  I bought extra fabric with this in mind.  It really kind of sucked seeing how much fabric is wasted because of the matching!  I need to get myself a plastic bin for all my fabric scraps.  Plus another for fabrics in waiting.  I can see how people start building up a stash... I also started to use a file folder with several slots to keep patterns in.  GENIUS.

Anyway, in order to start matching my plaids, I turned to the ever smart people at Coletterie and Sewaholic for their trusty tutorials.  They both have different approaches and sometimes one will speak more clearly to me than the other.  In this case it wasn't about which one was more clear, it was simply which one seemed easier!  I went with the tutorial from Coletterie which shows you to lay out your fabric flat, cut one piece, then flip it over and match it.  Cut, flip, match.  Then I switched to the tutorial on Sewaholic, and conveniently Tasia was making a cape too.  Score!  This helped me with my side pieces because they are curved and otherwise wonky.  I'm not entirely sure that my side seams will match beautifully, but the front, back and corresponding side pieces match to each other.  The back mirrors the front, the collar matches the back.  So, I'll look perfect from at least two sides instead of all four.  Also I decided to cut my welt pocket pieces on the bias right on top of a plaid square so I'll get cute little diagonal lines.  Adorbs.  I could tell when I had my pieces nicely matched because they practically became invisible on top of my fabric, as you can see here.
Once I had all of my pieces meticulously matched up, I matched them up with their corresponding pieces of interlining.  I basted them around all sides and like magic, two became one.  I can already tell this is going to be one cozy cape!
I apologize for the poor lighting.  My husband is a vampire.
Bonus!  I finished off my first spool of thread!  Go me!  That must mean I am really becoming an expert.

Once I started sewing together the pieces, I took more care to line up the plaid than to match notches and such.  I am pretty happy with how my matching is turning out!
IZSOPRETTY.
I may have stared at this for an entire night pleased as punch with myself for doing this. Woo!

The Great Cape Adventure

Friday, October 4, 2013

<a href="http://www.bloglovin.com/blog/10923421/?claim=pat5mvgrgy4">Follow my blog with Bloglovin</a>

I never thought I would be ready to make myself any sort of coat or jacket, but obviously in sewing I've been giving myself huge challenges and mostly coming out ahead.  So my next project was a cape coat jacket thing.  To make it even more challenging, I wanted to make it using the prettiest, softest plaid fabric in the universe.

ERMMYGAWD SO PRETTY (source)
This project's sewing challenges:
  • Coats or jackets tend to have lots of complicated pieces
  • Plaid requires matching up the lines
  • Buttonholes!
  • A collar
  • Adding interlining (not in the pattern)
  • Adding a lining (also not in the pattern) 
Whatevs.  I'll figure it out.

I knew I wanted a pretty simple design because a) that keeps things easy for me and b) the beauty of the style should be showcased in the design's simplicity.  Apparently although capes are becoming more mainstream, they're still not super common.  It took much searching to find this pattern:

Even this pattern isn't perfect.  1) It has gun flaps.  Um, no.  Well, okay, that's about all that isn't perfect about it.  What it DOES have that I was looking for, besides the simplicity, are the arm holes.  I didn't like capes that used the sides as arm .. areas .. and sometimes they were pinched together to form a sort of sleeve.  Also, this pattern has hidden pockets.  Who doesn't like pockets?  The arm hole and pocket hole are actually one in the same.  This will take a little extra thinking during sewing, but after going through the instructions I think I get it.

Since the instructions don't call for a lining, this gives me creative freedom to make my own.  I don't anticipate this to be too complicated, but we'll see.  My plaid fabric is a bit thin so I picked up fleece backed satin for my lining for a little extra warmth.  After sitting on this for a while, I decided I still wanted a little extra warmth.  Basically because this should turn out too cute for words and I'll want to wear it as long as I can without freezing.  I did some googling on interlining but wasn't really finding what I wanted, so I just went to Joanns in search of inspiration.  40% of the wandering I do there is for inspiration, 40% is for drooling and imagining all the things I COULD do, and about 20% is actually getting what I went there for.  I wandered around touching things to see what might make a wonderful interlining for my little cape.  I found this stuff, which is absolutely freaking amazing.  It's so, so soft.  It's drapey.  It's glorious.  Okay, it's batting.  What is a cape but a glorified blanket, really?

And thus starts The Great Cape Adventure.  Stay tuned for more!